Fit Foods
Fit Foods
Fit Foods
This feature is created and managed by my amazing friend, Sara. She's a die hard snowboarder, loyal friend and a recently certified cycle instructor. As a busy mom she's the first person I look to when I need to get out of my frozen food, pre-packaged meals rut. Her recipes are always fun, super healthy and amazingly delicious! Thank you, Sara, for being a part of this journey with me!
We'll post a new recipe each Friday for Fit Food Friday so come back each week to see what Sara has cooking!
May 12, 2017 - Smoothie
I have been trying a lot of different things in the morning. But very few foods seem to keep me satisfied until lunchtime. Oatmeal did it for a bit – then overnight oats were the next evolution, but nothing seemed to quite do it. Then I was at Whole Foods this week and saw it… Coconut Meat! I realized that is what I have been missing! It also happened to be right next to some Icelandic style yogurt – and it hit me. Breakfast Smoothie.
Now using the blender every morning isn’t always the easiest thing to do – I know the cleaning struggles. But this smoothie will keep you full for the morning. My thoughts is because many times when people make smoothies they focus on the protein and carbs aspect of it – but they forget about adding fats. Sure an avocado is another awesome fat addition to a smoothie – but I personally cannot stand avocados (I KNOW!) Anyway, adding fats to the smoothie means that you actually have a full balanced meal.
The recipe is packed with protein and fiber. The sugar is higher than I normally would like, but it is all natural sugar from the berries and coconut. The recipe below is made for two people because I always seem to make extra and share with a roommate or co-worker.
Protein Breakfast Smoothie
Makes 2 Smoothies
Ingredients:
1 Banana
1 5oz package of Plain Siggi’s Icelandic Yogurt
2 servings of Vega Vanilla Protein Powder
1 cup frozen Blueberries
1 Tbsp Hemp Hearts
1 Tbsp Flax Seeds
4-5 Coconut Meat chunks
½ cup Unsweetened Coconut Milk
Ice
Per Smoothie:
Calories 398, Total Fat 12g, Dietary Fiber 9g, Sugar 20g, Protein 38g
Instructions:
Mix everything in a blender :)
Done! What is your favorite smoothie?
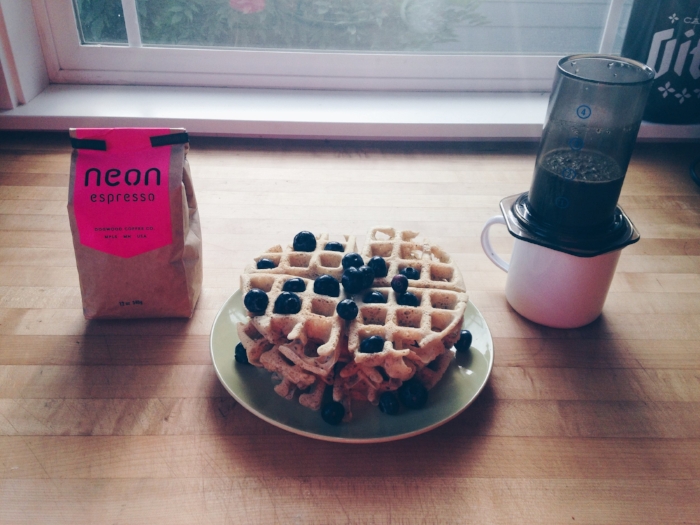
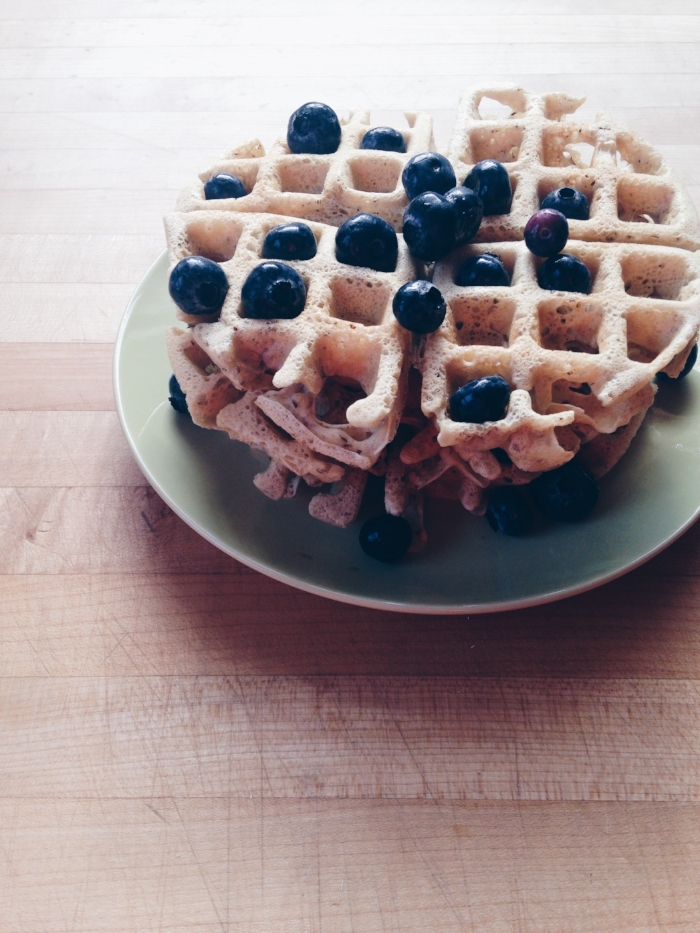
May 5, 2017 - Waffles

Waffles. I love waffles. They are probably the most welcomed thing on a Sunday Brunch menu. I personally like making them myself at home so I can add in whatever I am in the mood for that day. These might not be the most fit of foods – but they are vegan, and I highly suggest eating them with fruit, and even more brownie points if you eat them after a cycle or tabata class!
What’s the weekend without a little indulgence?
Waffles
Vegan
Makes about 6 Waffles
Ingredients:
1 ¼ cup unsweetened almond milk + 1 tsp apple cider vinegar
¼ cup coconut oil
¼ cup maple syrup
heaping ½ cup rolled oats
1 ¾ cups flour
1 ½ tsp baking powder
½ tsp vanilla extract
pinch of sea salt
Per Waffle:
Calories 301, Total Fat 9g, Dietary Fiber 6g, Sugar 10g, Protein 5g
Instructions:
Turn on your waffle maker, while the waffle maker is heating, in a large mixing bowl – combine the almond milk and vinegar. Set this aside as it will become your vegan “buttermilk”. It will take a few minutes to curdle/activate.
Next add in the coconut oil, maple syrup, and whisk. Set aside
In another large bowl, add in all of the dry ingredients. Whisk these together until they are well combined. Add the wet ingredients to the dry ingredients and mix well until they are all incorporated. Add the vanilla.
Now that your waffle maker is preheated – coat it with some non-stick spray and cook!
Eat your waffle warm and smothered in whatever mixings you prefer! A personal favorite? – lemon zest and poppy seed! I know Susan loves some chocolate chips with coconut flakes – let us know your favorite in the comments!
April 28, 2017 - Falafel Friday

Falafel Friday! Well… In truth I made these on Tuesday – but Susan is posting this on Friday – sot hat counts for something! I’ve been meaning to make these for a bit since they are perfect to have extra and serve in salads during the work week! This recipe is really easy because all you have to do is seriously throw everything into the food processor, scoop out into falafel balls, bake, and serve! So simple!
Baked Falafel
Vegan
Makes about 12 Falafels
Ingredients:
1 cup dry chickpeas – you’ll need to soak these in water overnight – see notes*
1 small yellow onion
4-5 garlic cloves
juice from half a lemon
½ cup packed fresh parsley (including stems)
¼ cup packed fresh cilantro (including stems)
1 ½ teaspoon ground cumin
½ teaspoon ground coriander
½ teaspoon ground cayenne pepper
heavy pinch of sea salt flakes
1-2 tablespoons EVOO + more for brushing
Notes*
Put the 1 cup of chickpeas in a bowl, and cover them with water – they will double in size so
make sure the bowl will be large enough for when they expand!
Per Falafel:
Calories 47, Total Fat 3g, Dietary Fiber 1g, Sugar 1g, Protein 1g
Instructions:
- Preheat oven to 400 degrees.
- Throw some parchment paper down on a baking sheet.
- Drain the chickpeas and put them, and all of the other ingredients in a food processor.
- Scrape down the sides as needed, the whole process shouldn’t take much more than three minutes. I used a cookie scoop to make the process SUPER easy – but scoop out the falafel mix and put onto your baking sheet, press down so they are flattened down a bit.
- Drizzle or brush the Falafels with some EVOO, and bake for about 22-25 minutes.
Allow them to cool and serve however you’d like! I made some Gyros with mine, but they are just as good used in salads or on their own with some hummus!
April 14, 2017 - Banana Bread Blunder

Okay – its Friday, I love Fridays. This morning I got up early, went to Tabata, went to Whole Foods so I would be well stocked for the weekend, and came home to get ready for work. But then I saw them. The over ripened bananas on the shelf. I somehow always seem to let Bananas get too ripe. I always assume I’ll eat them in the morning for a snack, or in a smoothie, or whatever, but never do.
Well not today. Today I decided to make some Banana Bread and bring into my co-workers, so everyone can like Fridays as much as me! I used my go to-recipe – and while I would have loved to have made this vegan, I was running short on time, and the eggs add some additional protein anyway ;) You can easily make vegan by replacing the eggs with your favorite egg replacer.
But want to know the best part?! When the Bread was finally done, and I was already 20 minutes late to work, I snuggly packed the bread in the seat next to me and got to work. While walking to the front door tragedy struck. I dropped it.
Yes. I dropped the Banana Bread that took me way to long to make and too much effort for 7am.
I managed to save half of it with quick reflexes, but of course this would happen. Oh well. It’s still Friday and it still tastes good! Now just half the calories ;)

Dairy Free Banana Bread
Vegetarian
Makes about 12 servings
Ingredients:
1/3 cup melted Coconut Oil
½ cup Maple Syrup
2 Eggs
1 cup mashed Banana (about 2 large Bananas)
¼ cup Coconut Milk
1 teaspoon Baking Soda
1 teaspoon Vanilla Extract
½ teaspoon Salt
½ teaspoon Cinnamon
1 ¾ cup Whole Wheat Flour
Optional: Chopped Walnuts
Calories 155, Total Fat 8g, Dietary Fiber 3g, Sugar 10g, Protein 4g
Instructions:
Preheat oven to 325 degrees.
Grease and flour a 9 x 5 inch bread pan.
Mix the Coconut Oil and Maple Syrup, once combined, add in eggs one by one.
Next incorporate the mashed Bananas.
Pour in the Coconut Milk.
Add the Baking Soda, Extract, Salt, and Cinnamon.
Mix everything until combined.
Turn the mixer down to the lowest setting and add the flour about a half cup at a time. Stop mixing once the mixture is combined. Do not over mix. I typically will stop the mixer early and finish mixing by mixing it a few times with a wooden spoon.
Pour into the bread pan, and if wanted, sprinkle the walnuts and a little extra cinnamon on top!
Bake for 50 – 60 minutes or until a fork comes out clean
Serve warm!
Make sure to treat it with care and try not to drop it ;)

April 7, 2017 - Peanut & Coconut Curry Bowls

You know those friends who you have in your life that you’ve had forever? The ones that continue to be there through thick and thin, even if you don’t talk every day/week/month? I have one of those, my good friend Allie and I have been friends since High School. We first met working together in a Hair Salon answering the phones, but we quickly developed a friendship based on shared interests and drive. She is a year older, so she went off to college first, and I got a boyfriend that I moved even further away for. We slowly talked less and less, and then barely at all. Lucky for both of us, we reconnected after boyfriends and college were over and it was like nothing really changed. We are still those same girls who have shared interests and are both incredibly driven humans. She is still someone I can count on for solid advice, and someone I know I can count on to split a bottle of wine and get ice cream when we are both craving it (which let’s be honest – is always).
Anyway, the reason why I bring up Allie – is because I got to cook this meal for her this week! I was so excited to be able to cook for her again, as it’s been quite a while since I have had the opportunity, so when thinking about what to cook for her – and taking into consideration the dreary weather Seattle has been having lately – these warm and flavorful bowls came to mind! This recipe is somewhat telling of our friendship too – there is a lot of multi-tasking that happens, but if you make time for it all – you’ll have one incredible dish! J I hope you make these with someone whom you can share so many memories with!
Some additional health benefits to this dish would be that the Sauce has plenty of spices in it to awaken the senses, including our friend Turmeric, which I talked about in the Golden Milk recipe! The Peanut Butter also adds some protein into the sauce as well. The Tofu also adds a boost of Protein, as does the Farro. And you can’t really go wrong with Steamed Veggies!
Coconut & Peanut Curry Bowls
Vegan
Makes about 4 servings
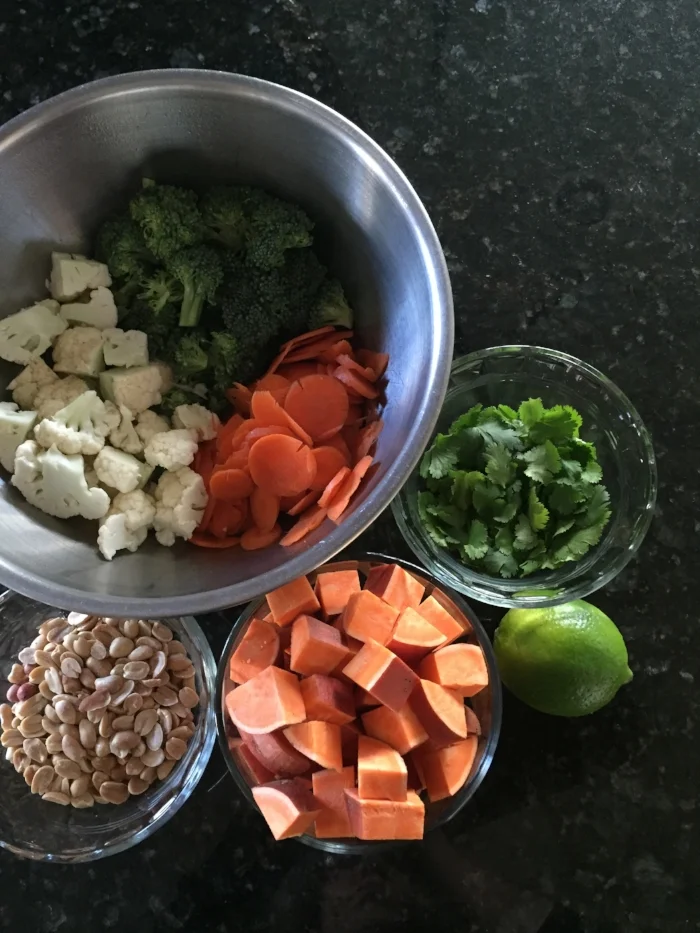
Ingredients:
For the Coconut & Peanut Curry Sauce:
1 can (14oz) Full Fat Coconut Milk
2 cups Unsweetened Coconut Milk
¼ cups Tamari
1-3 Tablespoons Red Chili Paste
¼ cup Creamy Peanut Butter
1 heaping teaspoon Turmeric
½ teaspoon Garlic Powder
For the Tofu:
1 lbs Extra Firm Tofu
Canola Oil
Sea Salt
Chili Powder
Garlic Powder
For the Bowls:
Cooked Farro (see Farro notes from Happy Bowls recipe)
Steamed Veggies
My favorites for this recipe:
Sweet Potato
Carrots
Cauliflower
Broccoli
Kale
Peanuts – chopped
Fresh Cilantro
Lime Wedges
For the Coconut & Peanut Curry Sauce:
Calories 261, Total Fat 16g, Dietary Fiber 4g, Sugar 3g, Protein 7g
For the Spiced Tofu:
Calories 155, Total Fat 12g, Dietary Fiber 2g, Sugar 1g, Protein 10g
For the Bowls w/all fixins:
Calories 610, Total Fat 31g, Dietary Fiber 13g, Sugar 9g, Protein 26g
Instructions:
Begin with the sauce as it will take the longest. To do this – mix all of the ingredients in a medium saucepan, and bring to a boil. Once boiling, bring down to a simmer and simmer for 30 – 45 minutes depending on how thick you want your curry.
Next while the curry is cooking, I suggest you prep all of your vegetables. Cut/chop the veggies to the desired sizes that make it easiest to steam.
Prepare the Tofu by draining the water out of the container, and pressing the Tofu between paper towels, I typically stick some dish cloths under it to soak anything from going through to the counter tops. You can press it by hand for about a minute, being careful not to apply too much pressure to destroy your Tofu! Or you can leave a heavy book on the top paper towel and come back to it after 5 minutes.
When the curry gets down to about 15 minutes, I suggest you start the Farro. I again used the 10 minute Farro from Trader Joes, so adjust this if needed based on your Farro’s cooking method. Once done, drain and set aside.
Prep the Tofu Rub: Mix together the Chili Powder, Garlic, and Sea Salt to desired taste, feel free to add different spices to this based on your own preferences!
Next take your Tofu and slice it into about a quarter inch to half an inch thickness and lay the Tofu in the rub and coat both sides.
In a large skillet, heat Canola Oil on medium heat, once the Oil has reached a temperature that when you spray a bit of water on it, it sizzles, lay the Tofu in. Cook Tofu on both sides for about 5 minutes each. The edges should be crispy.
Now steam the vegetables, depending on which you chose to steam, this should take about 5-10 minutes. My steamer piece went missing when I needed it, so due to improvisations it took me a bit longer. ;)
Once your Farro, Veggies, Tofu, and Sauce is done, it’s time to assemble the bowls! I do it by putting the Farro down first, then Veggies, then Tofu and pouring the sauce over the top.
Then I sprinkle the chopped Peanuts, Cilantro, and finish by squeezing a bit of lime on top. Done!
I promise this one is worth the craziness. It’s SO GOOD. The leftover (there will be plenty) Coconut and Peanut Curry Sauce can be stored in the fridge for about a week, but if you freeze it, you can put it in the fridge for 24 hours before the next use to get a longer shelf life.
Enjoy the recipe and let us know if you try it out. Excited to hear if there are other spice variations that you try!
April 1, 2017 - The Aftermath
Okay, I’m going to complain about something that NO ONE should complain about: I just got back from a two week vacation. On this vacation, I ate EVERYTHING I wanted. Sounds horrific, right? I mean, what kind of food could I find in Boston, Paris, Brussels, and Amsterdam? Oh you know – Vegan Espresso Oreo Birthday Cake, Macarons, Chocolate, Waffles, Stroopwaffles, and that’s only the treats. I won’t even get started on the wine. Like I said – NO ONE should be complaining about this.
However, I have noticed the following: I haven’t been sleeping well. My face is officially breaking out everywhere, and I don’t have as much energy as I typically do. We COULD chop this up to the rigorous travel schedule, but lets be honest, I travel like this pretty often. I am gone about 100+ days a year for my job, but it’s never really affected my health in this way.
What does this have to do with the weekly recipe on SBS? Well thanks to all of the treats I ate over the last 10 days – I am putting myself on a sugar restriction. I have a severe sweet tooth. I always have. I am actually a much better baker than cook, but I am trying to change that, but working on a new recipe weekly for SBS, but for the next month, I am going to kick it up, but trying to cook more at home, and remove all added sugar from the process.
Over the next month – I plan on documenting how I feel, and how removing sugar affects my daily living. I would obviously love to lose the extra vacation pounds that I gained, but more importantly – I’d like to live a healthier life!
Okay! Update over. Thanks for reading through it if you’ve made it here. On to the first recipe for the week! One of my favorite spices to use is Turmeric. Why? Because the benefits of turmeric are basically endless. A few? Natural anti-inflammatory, natural antibiotic, natural antiseptic, natural analgesic (pain killer), improves digestion, antiartritic, helps gas/bloating, improves skin, lowers cholesterol, I can go on, but I’ll stop there. So what am I using it in? Golden Milk. This is an amazing drink to make either in the morning, or before bed. I like it before bed, as it helps with relaxation and getting to bed faster. I make mine with Coconut Milk, but feel free to substitute with whatever nut milk is your favorite.
Golden Milk
Vegan option
Makes about 2 servings
Ingredients:
1 cup unsweetened plain coconut milk
½ teaspoon Turmeric
¼ teaspoon Cinnamon
½ teaspoon raw honey (or maple syrup if vegan)
small pinch of black pepper (will increase the absorption)
dash of ginger
dash of cayenne pepper (totally optional)
Calories 35, Total Fat 3g, Dietary Fiber 1g, Sugar 2g, Protein 1g
Instructions:
To make your life easier, I recommend blending all of the ingredients before heating up, just blend until smooth with your choice of blending method.
Then, pour into a small saucepan and heat for about 3-5 minutes, just until its hot, but not quite to a boil.
Drink immediately.
Please take note that turmeric is a very pretty yellow color, this might stain clothing, so I don’t suggest making this recipe in any light colored clothing if you are a klutz like me!
That’s it! Easy, and a million health benefits to boot! Try this out and let me know what you think! Keep an eye out for more uses of Turmeric as the sugarless month continues, feel free to offer any wisdom for me to reflect on while I am suffering from the sugar withdrawals. ;)
March 24, 2017 - Biscuits

Bread is one of my favorite things. I could literally eat it at all times of the day. However, since I do not have the metabolism of a 16 year old anymore – I have to practice self control fairly often. One time I indulge? Brunch. My favorite thing to get at brunch – and I almost always save this for the last thing I eat – is a biscuit and jam. Some mornings were just made to indulge though, and what’s my go to recipe when I make them from home? This one.
Not going to lie, the key to a good fluffy biscuit is how you mix it. I choose to go the food processor route so I touch the dough as little as possible, but its not 100% necessary.
Biscuits
Vegan
Makes about 8 biscuits
Ingredients:
1 cup unsweetened plain almond milk
1 Tbsp lemon juice (fresh is best!)
2 cups unbleached all purpose flour
1 Tbsp baking powder
½ tsp baking soda
¾ tsp sea salt
4 Tbsp non-dairy butter
Calories 170, Total Fat 6g, Dietary Fiber 1g, Sugar 3g, Protein 3g
Instructions:
Preheat oven to 450 degrees
Add the lemon juice to the almond milk in a small container and set aside. This will be your “buttermilk” in a few moments!
In the food processor, using the pulse feature – mix all of the dry ingredients together (if not using a FP, just use a whisk).
Cut in the butter by cutting up pieces and adding to the mix slowly and continuing to use the pulse feature. Incorporate everything until it looks like sand (if not using the FP, use a pastry cutter or your fingers to mix the two – the mixture should also end up looking like sand).
Add in the “buttermilk” slowly and continue to use the pulse feature, the mixture will now start to get sticky. You generally won’t have to use all of the milk, make sure to watch the mixture closely (if not using the FP, using a wooden spoon, make a well in the middle of the dry mixture, and slowly add in the milk, also keeping in mind that all of the milk might not be used).
Take the mixture out of the processor or bowl, and onto a floured surface, dust the top with a bit of flour, and then very very gently turn the dough onto itself about 5 or 6 times. Be careful not to knead too much here – you want a fluffy final product!!
Next form the dough into 7 or 8 even pieces, I do this by cutting the dough in half, then cutting those pieces in half, then repeating a third time. Making sure not to handle the dough too much, but trying to make the pieces into little balls.
Next arrange the dough so they are all touching one another – trust me, this will help them bake evenly.
Last little trick – using your finger, make a small divot in the tops of all of them so they don’t form a dome. Lightly brush with some more butter, and throw those bad boys in the oven!!
Bake for about 10 or 15 minutes, or until they are to your liking. I like mine to be fluffy and lightly gold at the top!
Now I like to eat mine fresh out of the oven, still hot, so the butter melts when I put it on. Add the jam and perfection! How do you like your biscuits? Smothered in gravy? As an egg sandwich? Tell us how you like to eat your favorite biscuit recipe and let us know if you try this one!
These also store wonderfully for about a day or two. Perfect to have with your favorite strawberry shortcake later in the day. ;)
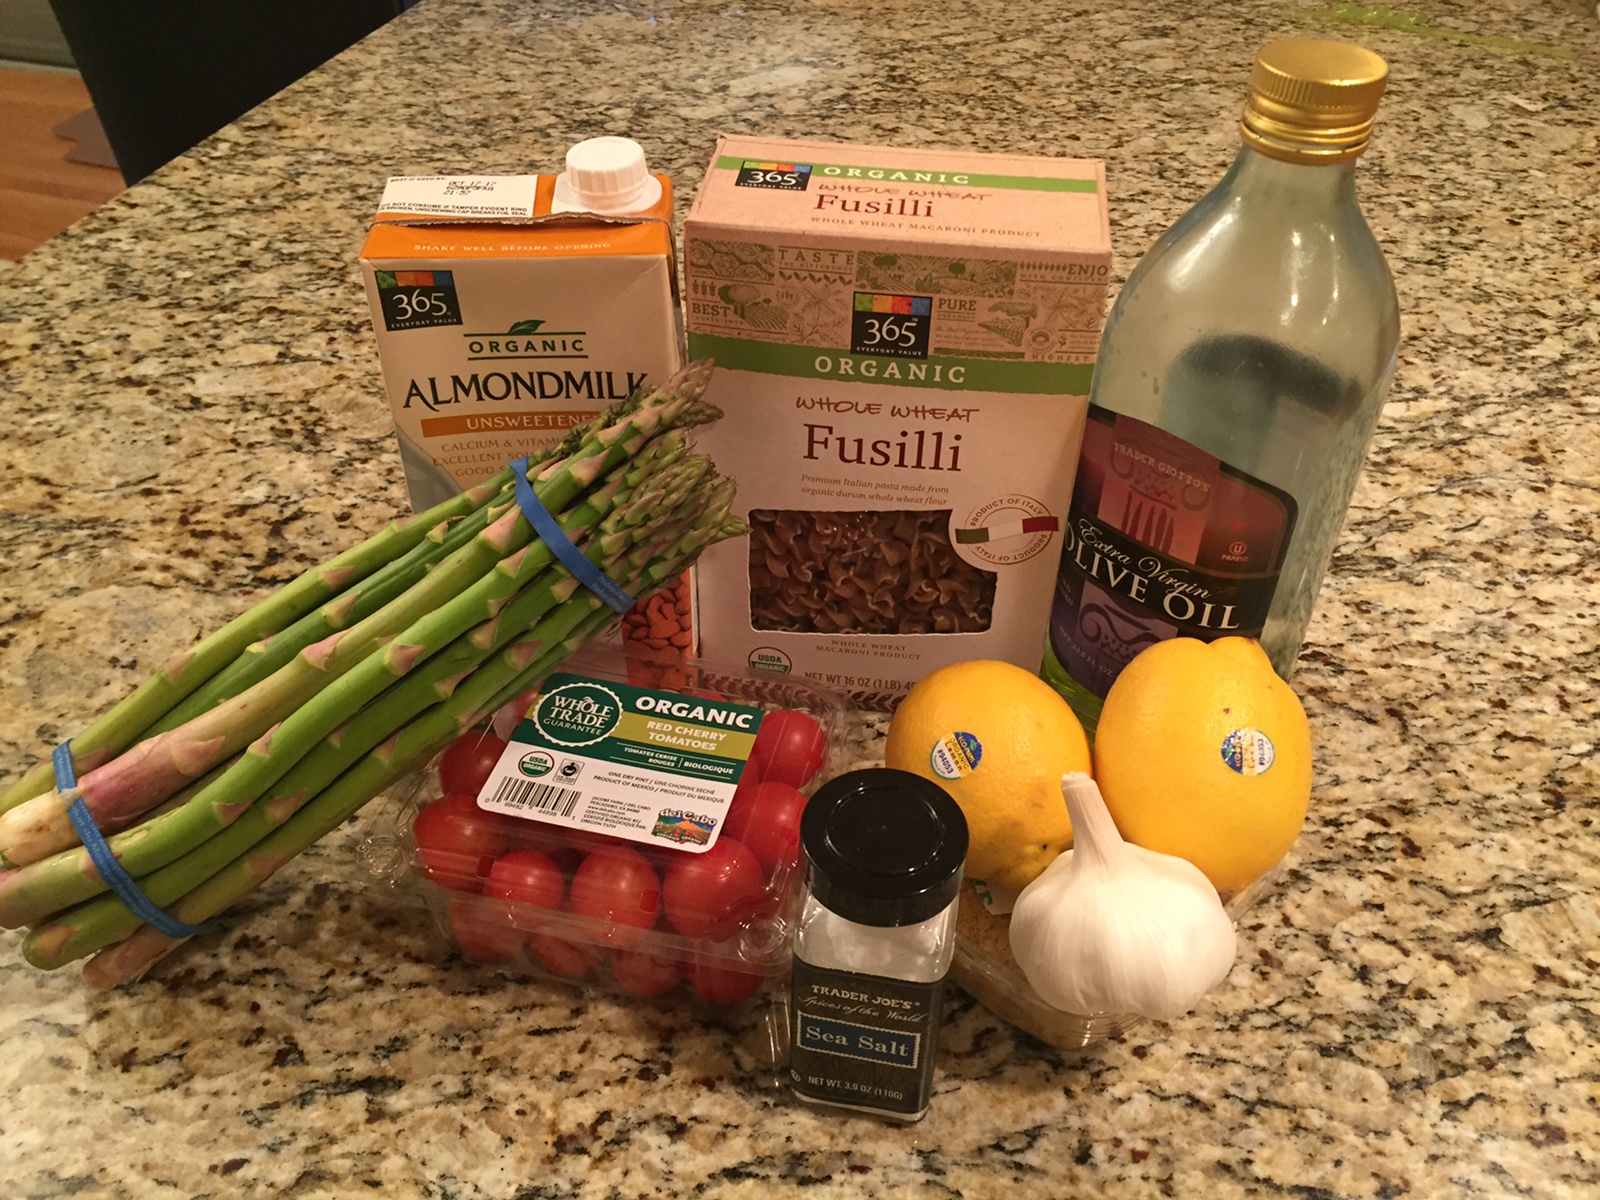
March 17, 2017 - Creamy Citrus Pasta
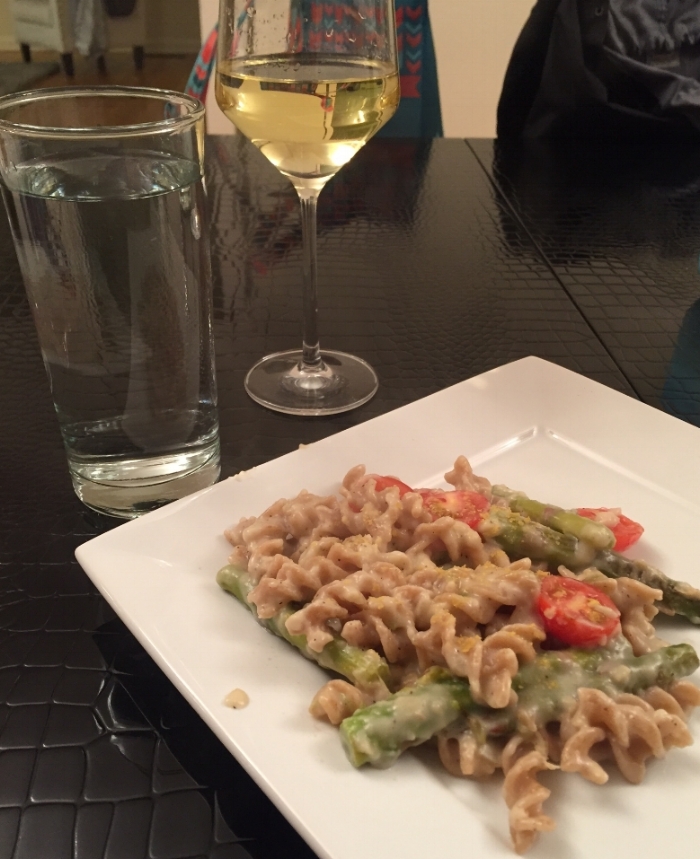
Sometimes comfort food is really all we need. That’s just what my body was craving last week when deciding what to make for fit foods this week! I knew just the recipe for Susan and I to enjoy – as asparagus was in season! I think its so important to buy foods when they are in season, it truly makes all the difference and you can really taste the difference. This recipe using nutritional yeast – which many people don’t often incorporate or have on hand, but fear not! It’s so easy to find, and Whole Foods sells it in bulk, so you don’t have to worry about having too much left over if you go that route! It also reheats wonderfully – so its perfect for a packed week when you just want to make it early in the week for leftovers.
Creamy Citrus Asparagus Pasta
Vegan
Makes about 4 servings
Ingredients:
1 bunch asparagus (or more if you love asparagus)
Pinch Sea Salt
Pinch Pepper
2 lemons
Olive Oil
Crushed Garlic
10 oz Pasta (my favorite is bow tie or fusilini)
2.5 cups Unsweetened Plain Almond Milk
3-4 Tbsp All Purpose Flour
1-2 Tbsp Nutritional Yeats
+ Cherry Tomatoes if that’s your thing!
Calories ~400, Total Fat 14g, Sugar 1g, Protein 15g
Instructions:
Preheat oven to 400 degrees
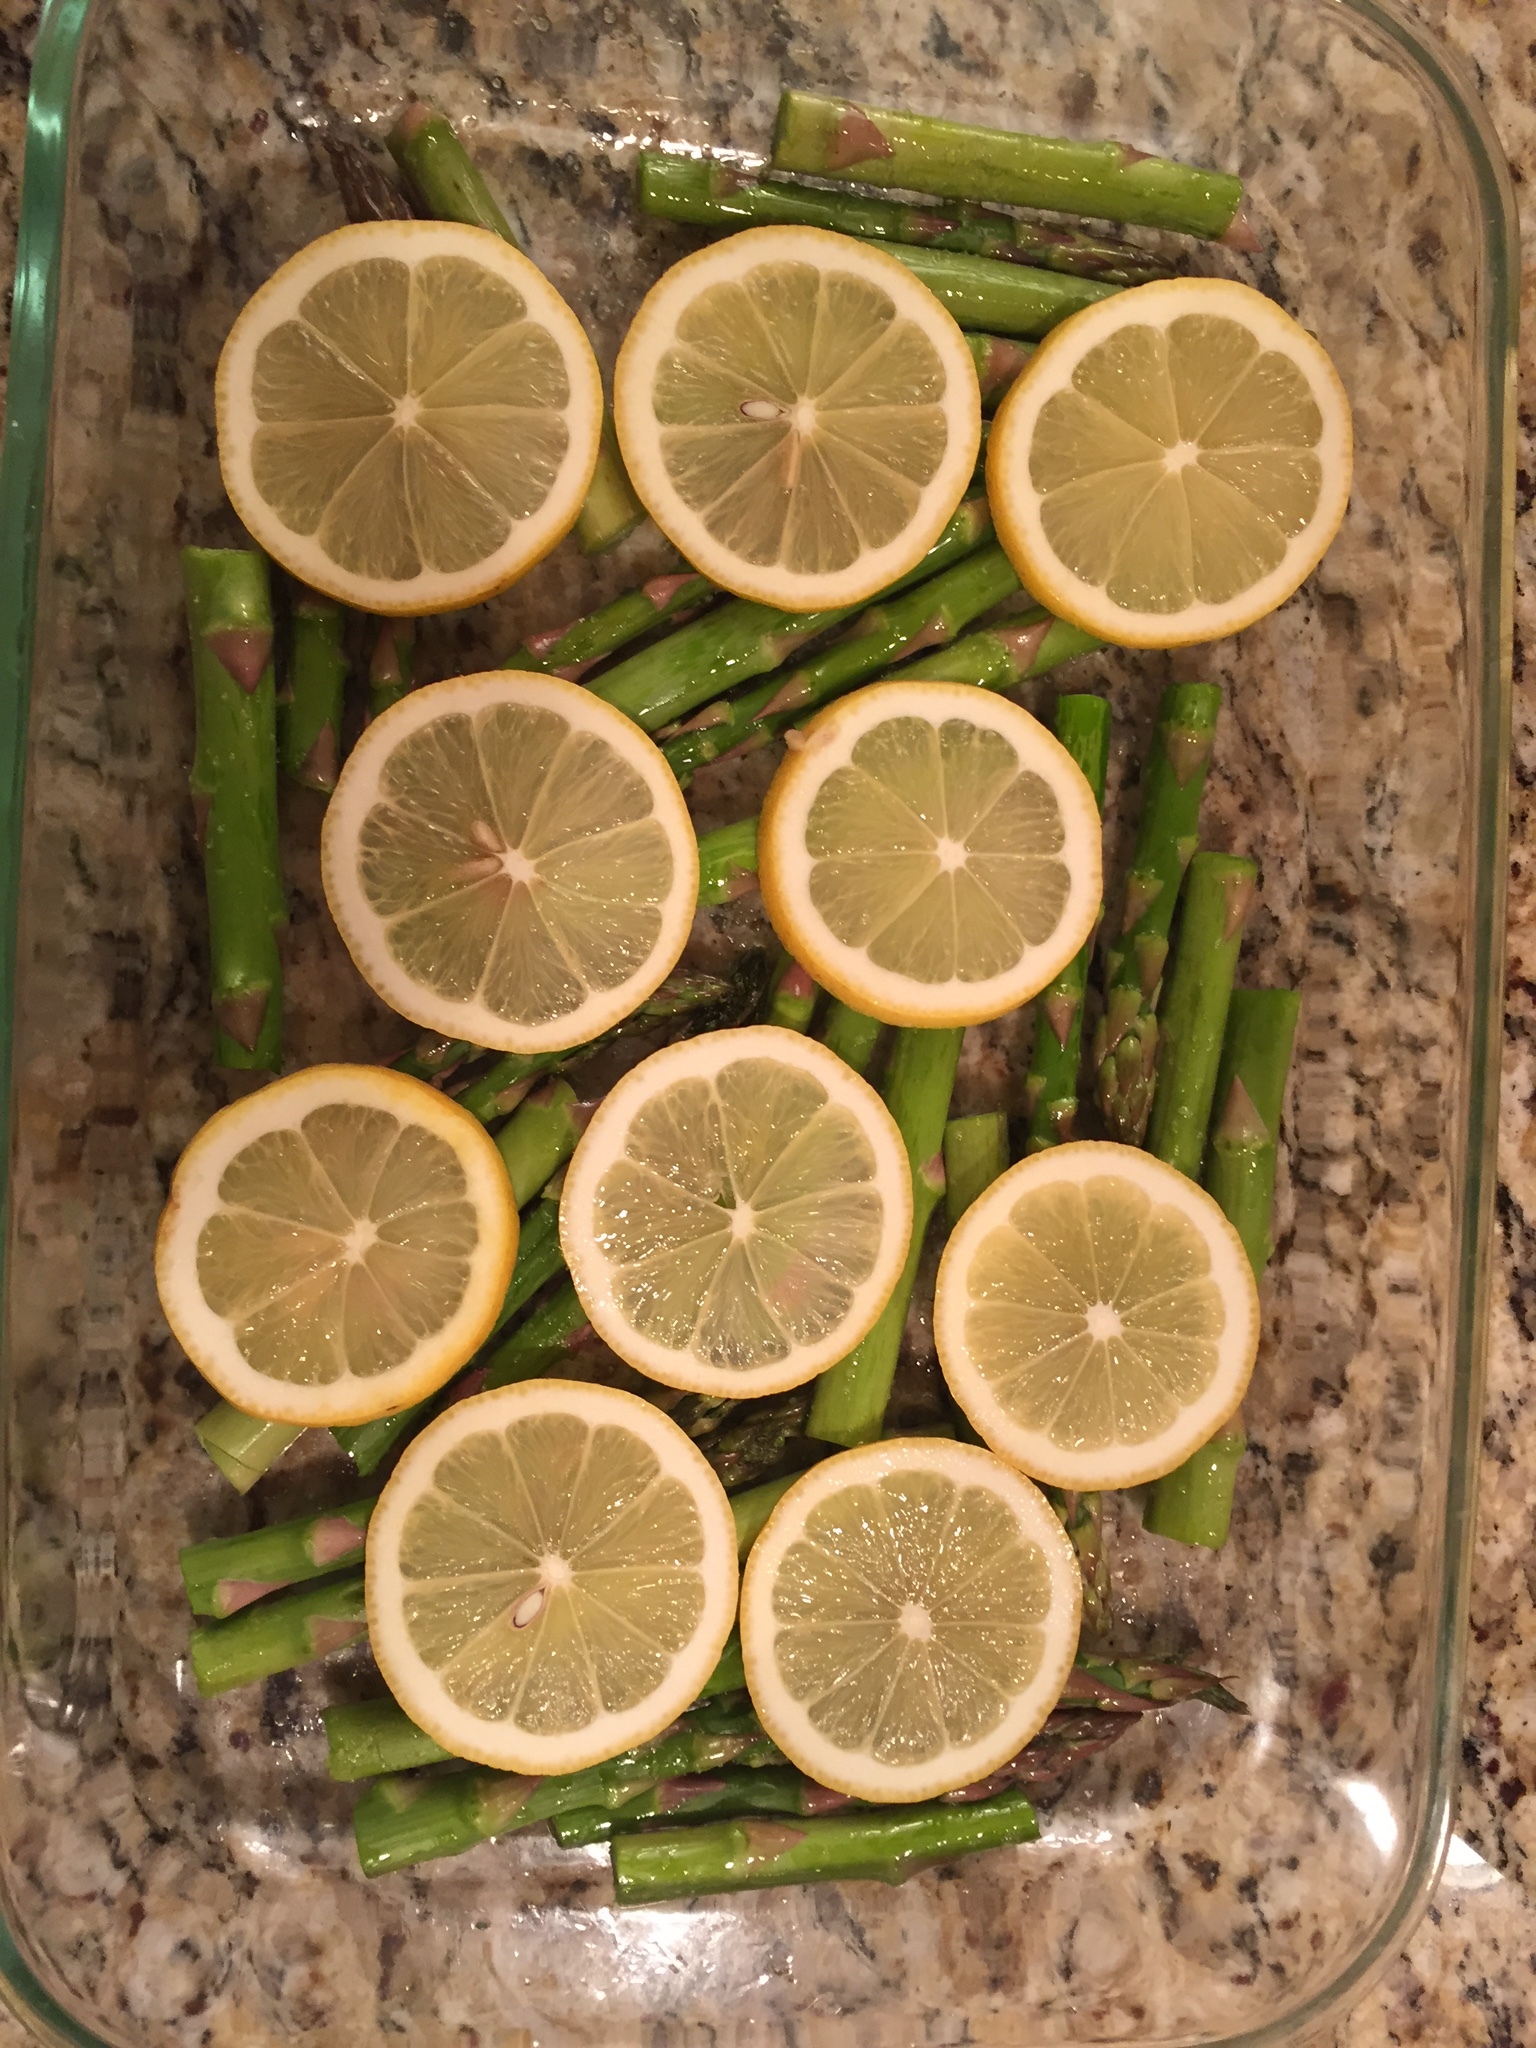
Chop your asparagus into smaller pieces, I do this to make sure to get more pieces crispy as there are more ends! Plus it mixes in easier this way. Toss the cut asparagus in a bowl with the Oil, Sea Salt, and Pepper – make sure to get the asparagus well coated – arrange on a baking pan. Cut the lemons into thin slices and arrange on top of the coated asparagus. Bake the asparagus for about 20-25 minutes.
While the asparagus is cooking, bring a large pot of water to boil and make sure to salt. While the water is being brought to a boil – bring a large skillet pan to medium heat, once warm enough – add some olive oil to coat the pan, I’d say about 3 Tbsp. Add in the crushed garlic – I use about 4-5 cloves, but I LOVE garlic, so adjust to your preference. Brown the garlic and add in the flour. Then, add in the almond milk. I use a whisk to get everything incorporated. Next add in a few more pinches of Sea Salt and Pepper. This will cook down, make sure to watch and stir occasionally.
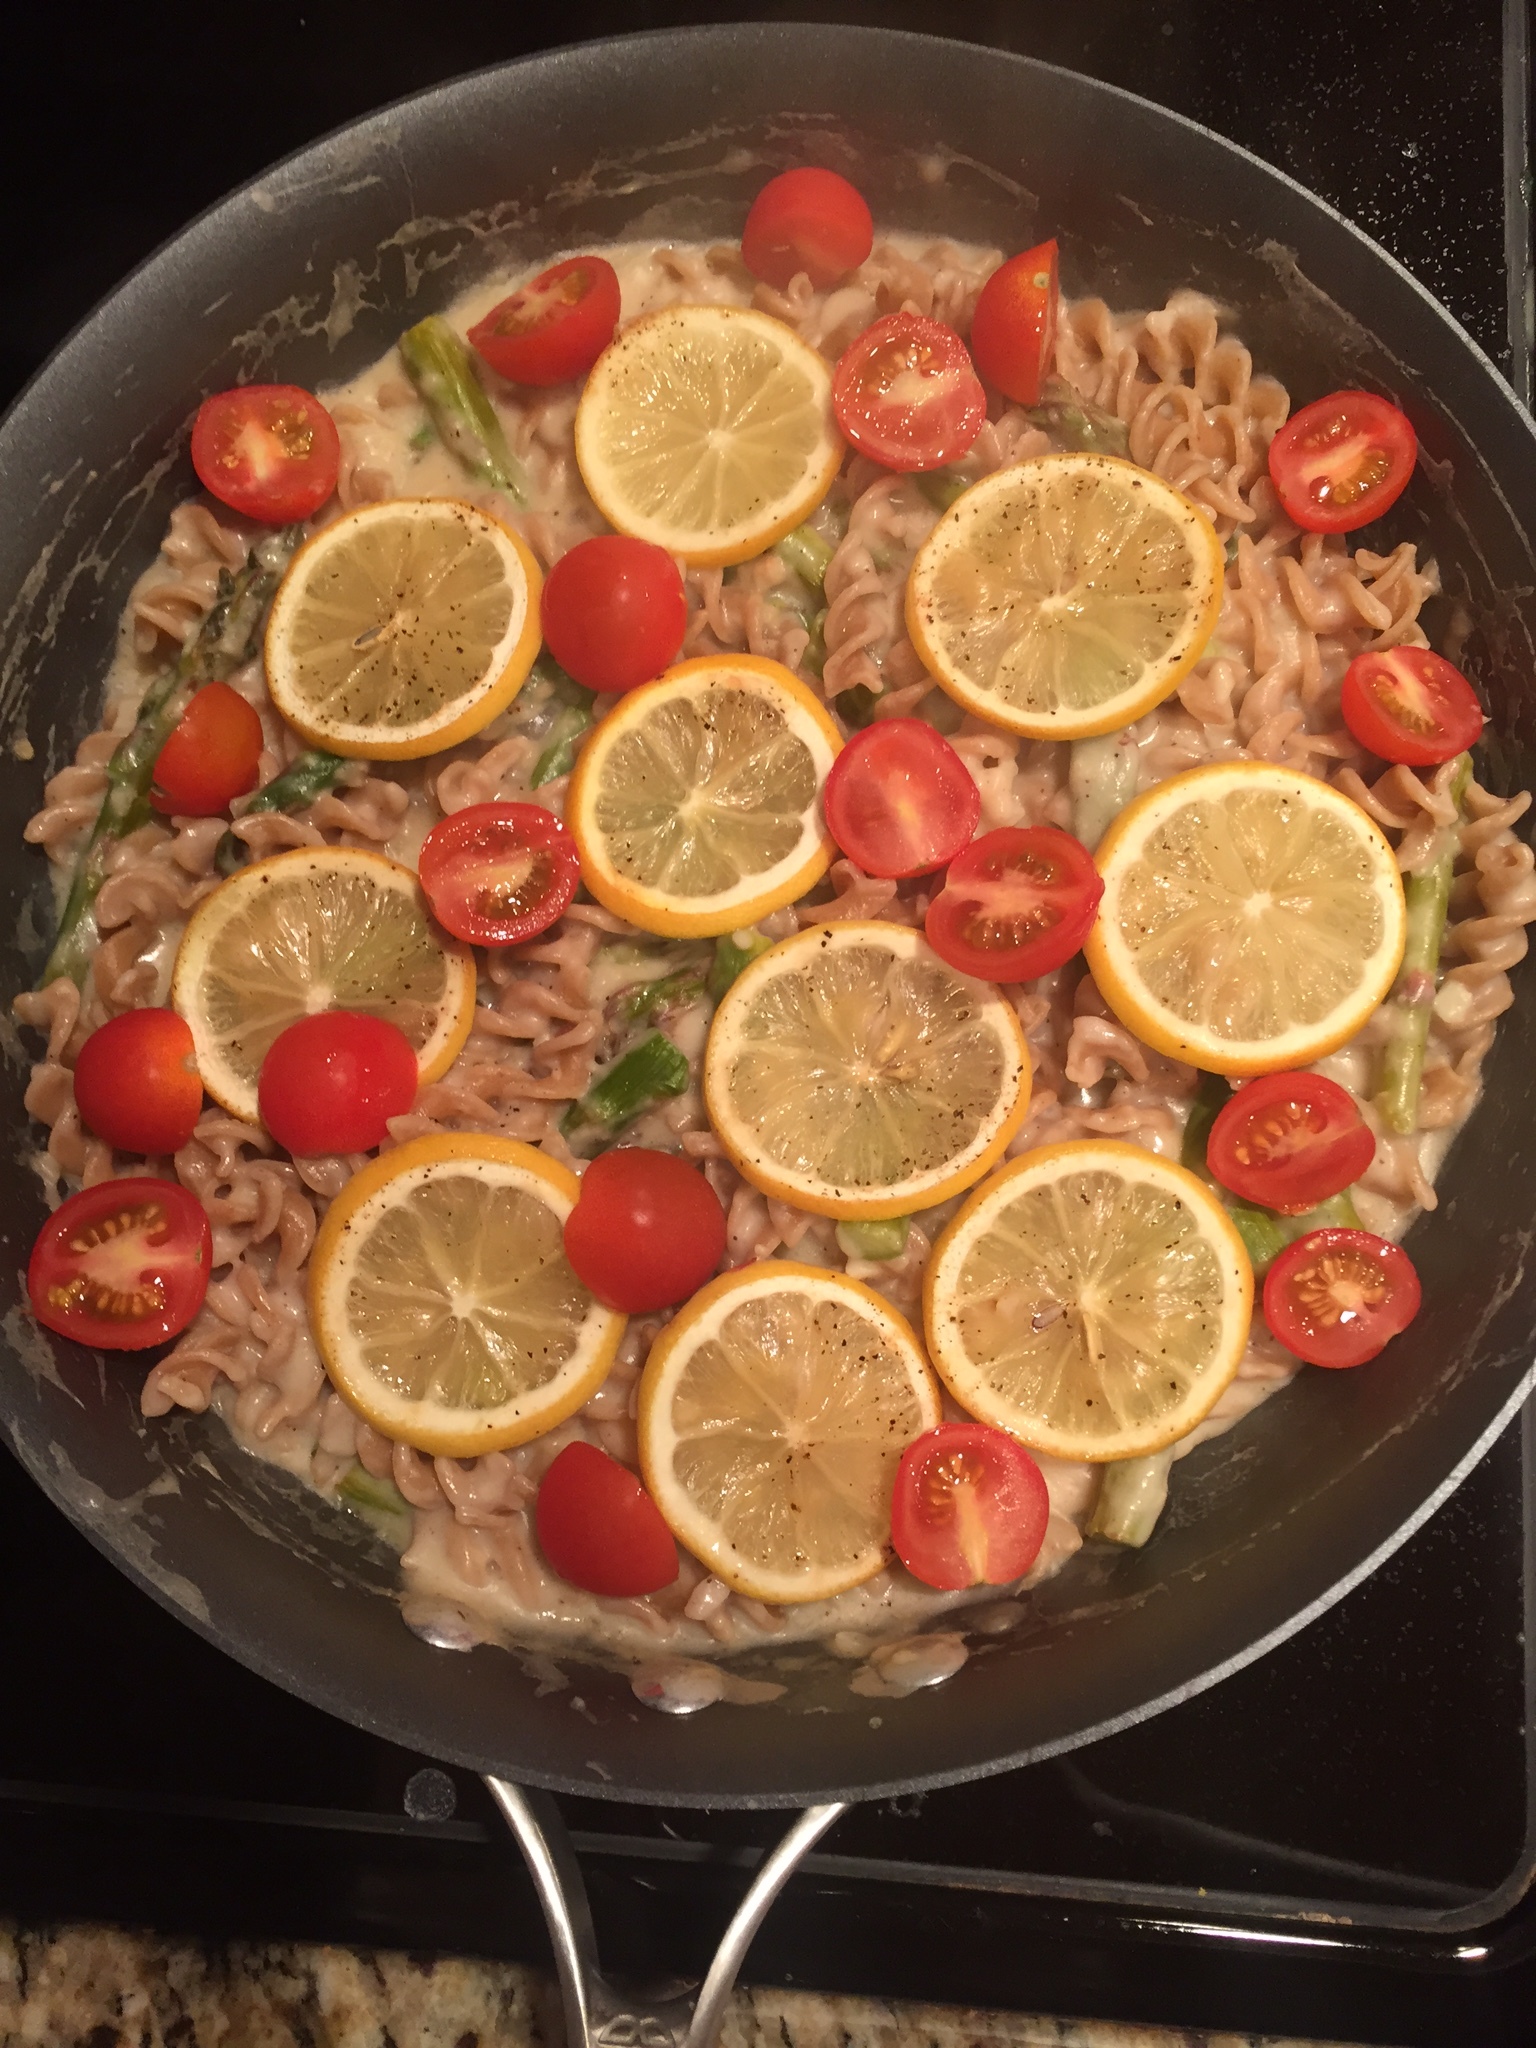
Now hopefully your pot is boiling. Add in the pasta to cook to package’s instructions, drain, and set aside for later use. With the sauce, I typically make sure to just use the whisk well, but it you want a really creamy sauce, feel free to add to a blender, or use an immersion blender. Add in the nutritional yeast, an extra dash of salt and pepper, and continue to cook.
Once the sauce is to your liking, add some lemon juice, and stir in, then add in the asparagus and the cooked pasta. Toss all together. I like to cut and add in the cherry tomatoes to the mix, but feel free to add whatever else you think sounds good! This recipe generally keeps in the refrigerator for 3-4 days. Enjoy!!
March 3, 2017 - Energy Balls

åAlong with liking when meals come together easy – I also really enjoy being able to make my friends things that they are requesting! This past week I was at a brunch for this lovely blog creator – Hi Susan! – and one of the girls needed some Energy Balls for a weight loss challenge she was running. I quickly remembered there was a recipe that I used for Energy Balls recently that would work perfectly here. I quickly volunteered to make all she needed and I was on my way!
Now the irony here is that energy I did not have. I had just completed a 24 hour marathon of Snowboarding at my local mountain. I didn’t ride straight for the 24 hours, but we were supposed to take at least two runs every hour, and try my best to do so – I missed an run or two by sneaking in some sleep in the back of my Forester parked at the base of the runs. The best part about these Energy Balls though – they are so simple to make, and come together so quickly!! Very little effort for such a great return.
I keep these around the house for when I need an extra boost of energy before going out or following a workout. Really you can have them at any time and you’ll be happy you did. The nut portion of the recipe is interchangeable. I personally like walnuts as I have a few friends with an Almond allergy, and I like being able to share so I don’t eat them all in one sitting. ;)
Energy Balls
Vegan
Makes about 30 balls
Ingredients:
2 cups Walnuts (or any other nut)
1 cup shredded unsweetened coconut
2 cups soft medjool dates (make sure these are pitted!)
2 tablespoons coconut oil
½ tsp sea salt
1 tsp vanilla extract
+ extra shredded unsweetened coconut for the rolling
Calories 103, Total Fat 9g, Dietary Fiber 2g, Sugar 5g, Protein 2g
Instructions:
Make sure the medjool dates have been pitted, I typically buy mine from the prepared foods section of whole foods, and will have to do this manually as the recipe comes together. Its not hard to do at all, just cut and pull the pit out. Easy! However – medjool dates are pretty sticky, so don’t try to play DJ on your phone at the same time like I did, or you’ll have to wash your phone later!
Throw the walnuts and coconut together in a food processor and get them blended together, I pulse them for about 2 minutes.
Next add in the dates and coconut oil. Pulse all of the ingredients together and get them to start to stick together now that the dates are in there.
Lastly add in the sea salt and the vanilla. Pulse until you think its ready to be rolled up into the balls.
To make this process slightly easier – and because I love it when things are uniformed – I use a Tablespoon to scoop out the mixture, then roll the balls in the remaining coconut. Making sure to coat them so they look pretty.

And that’s it! Let me know if you have your own variations of Energy Balls, I know most fitness gurus have a go to – so I’d love to have other ones to try!

February 22,2017 - Happy Bowls

I like it when meals come together fairly easy. Not to say I won’t put in the effort for the right dish, but with my schedule, coming home often times after 7 and a work out, easy is nice. Easy allows for me to shower while it simmers. Easy makes me happy. Which is why I have named this dish Happy Bowls!
These are for sure a go-to when I am feeling like I need a whole meal! These are a perfect balance of the right Complex Carbs, Healthy Fibers, and Protein. It’s a tad light on the protein if you have just completed a work out, so please feel free to add a protein drink (My go to is the Vega Sport Protein Powder!), or your own protein directly in the dish if needed! The best part about this meal is that you can’t really mess up!
Happy Bowls
Vegan
Serves 4
Ingredients:
Olive Oil
Minced Garlic
3 Sweet Potatoes (medium sized – chopped into cubes)
15oz can of Black Beans (I use a ‘spicy’ version from Whole Foods)
Bunch of Kale
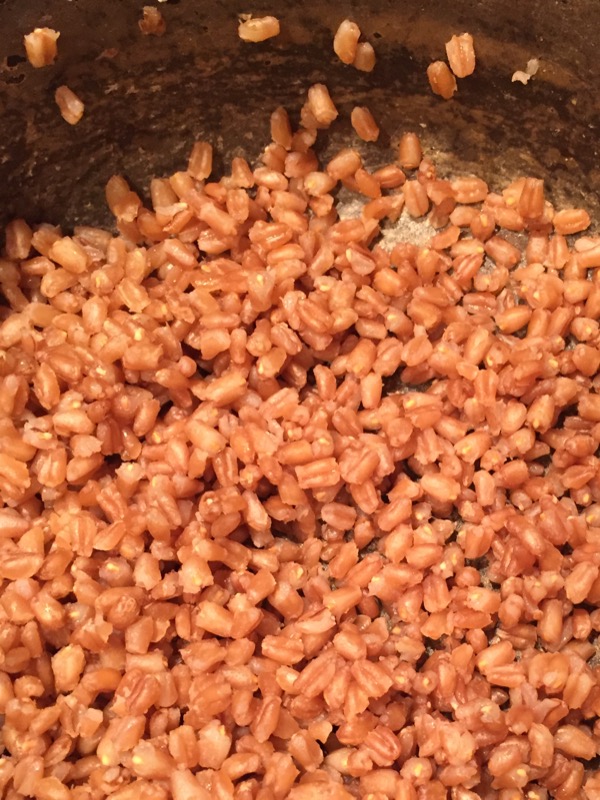
Farro (I use the 10 minute version from Trader Joes)
Calories: 455, Total Fat 6g, Dietary Fiber 14g, Sugar 7g, Protein 17g
Instructions:
If you haven’t done so already, chop your Sweet Potatoes into cubed sized pieces, thickness is of your own choosing, but I generally prefer about a half inch square of Sweet Potato, so they can fully cook to soft through.
Once chopped, using a fairly large skillet, heat some oil and sauté the garlic so that it become aromatic – I love garlic so I tend to throw in more than the average person – blame it on my Italian background.
Next add in the sweet potatoes and coat them in the oil and garlic. Turn the heat to low/medium and let them cook and absorb the flavor. I’ll add some water to help them simmer while they cook cause I like to leave them simmering for awhile so the potatoes cook fully through, stirring intermittently.
Once you feel the potatoes are cooked about half way – I’d generally say about 15 – 20 minutes – add the can of Black Beans. Mix everything together in the pot and let it simmer for another 15 – 20 minutes stirring occasionally.

While the final simmer is going on – cook the farro according to the packaging’s instructions! This should only take 10 minutes if using the Trader Joe’s version.
Now take the kale and add to the top of everything, cover, and let the natural steam steam the kale! Once steamed so the kale is bright green – remove from the top and place on a bed paper towels to help absorb some of the excess moisture.

Now its time to assemble! I generally put the farro down first, then add the garlic/sweet potato/black bean mixture, then the kale on top – but feel free to mix it up! Add some other toppings if you’d like as well. Sometimes I add some pumpkin seeds, or something else crunchy! But just make sure to enjoy it!